
The following instructions describe how to connect to your email account mailbox using Outlook or similar email client software.
This article is primarily for the benefit of our clients who use the NuFocus email servers for their domains even though the information may be of interest to other readers.
Each version of email client software can use a different screen layout and unfortunately often the names of the options are slightly different causing confusion relating the instructions to your specific version of email software. However, using the descriptions provided below it should enable you to select the correct settings for your situation.
Some programs may have more security options that can be enabled, but the instructions on this page only cover the major functions. More detailed security options are discussed here.
First a quick overview. The email system uses SmarterMail software that provides an integrated mail system with support for Pop3 or iMap for reading your mail and SMTP for sending emails. It also has an online web mail facility that incorporates an email account management portal to define all the email accounts and settings for your domain. This includes password, user accounts, and spam and content filters.
To read more about SmarterMail look at the documentation online as this address http://help.smartertools.com/SmarterMail/v11/ or read the online help from inside your webmail/account management portal.
To configure your email account you must have to hand your username, password and a valid email address or alias. Click on any image below to see a large popup version.
Open Outlook (or similar email client) and go to the account settings section (Tool – Accounts – Change Account) and find the page similar to this one
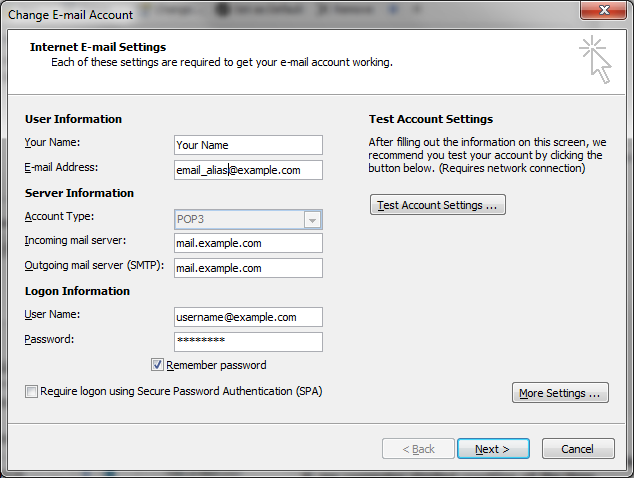
The fields that must be completed correctly are:
- email addres: use any of your valid email addresses here
- incoming server/outgoing server: change this to match your own domain name
- enter your unique username (do not use your email address unless your username and address are the same) remembering to include your domain name as part of your username
- enter your password and set to save the password!
If the More Settings is button is on this screen choose this option and then select the Outgoing Server tab, otherwise click Next
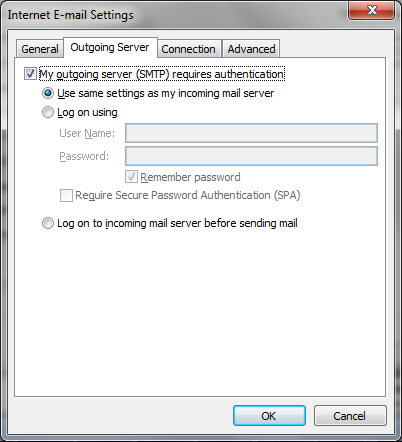
The import setting is to select My Outgoing Server (SMTP) requires authentication or you wont be able to send any emails. Sometimes this setting is on the previous screen.
Also the simplest approach is to choose Use same settings as my incoming server, but you can select the Log On using option and enter all your login details again.
Now choose the Advance Settings tab and you should have something like this
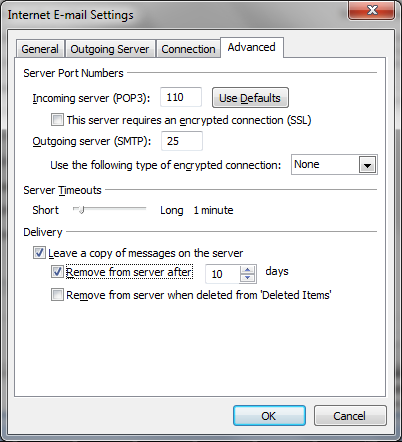
The default port for outgoing email is port 25 and you do not need to select any addition security or encryption.
If you do specifically want to use SSL encryption then we recommend you use Port 465 or 587. Also if you travel a lot and often connect from public wifi systems then we recommend you use Port 587. A more detailed description of how to use these settings will be published soon.
The bottom section labelled Delivery is an important option for how your mail messages are handled, but won’t affect your ability to send your emails.
Normally emails are deleted as soon as they are dowloaded, but this means the first device to download emails deletes the mail so another device cannot also read the same emails. These days with smart phones, multiple computers etc, people find it move convenient to leave emails on the server so that other devices can read the same mail.
If you never delete emails then your mailbox will grow and grow until you run out of quota so it is advisable to delete emails on a regular basis. A simple way to do this is to set the option to delete after x days so you get the benefit of emails being available for all your devices but older emails are deleted automatically.
Finally there is an option to have emails deleted on the server as soon as there empties from the deleted folder of your Outlook programme.
To see too configure additional security options click here.
Hopefully this information will be assist you to configure your email client to connect to your account mailbox, but if you have any problems contact support for more personalised assistance.
Recent Comments